Postfix Delivery Errors

If your using Gmails SMTP relay and receive either of the following errors, switch your outbound mail to use port 587.

Show Postfix errors;
tail -f /var/log/syslog
Look for either of these;
delivery temporarily suspended: connect to smtp-relay.gmail.com
delivery temporarily suspended: lost connection with smtp-relay.gmail.com

The fix;
vi /etc/postfix/main.cf
Update the realyhost;
relayhost = smtp-relay.gmail.com:587

Ref: https://support.google.com/a/answer/2956491?hl=en

Hardening Apache- Disable Directory Traversal

Problem is directory’s such as /wp-includes/ are viewable.
Disable directory traversal by adding this line to the end of your .htaccess file in the root of your website directory:

Options All -Indexes

Then restart:

systemctl restart apache2

Confirm this is disabled by navigating to /wp-includes/

VMWare ESXi setup Syslog through ESXCLI

To setup syslog in ESXi 6.5 I found it easier through the ESXCLI, here are the commands to run:

Allow syslog through the firewall:

esxcli network firewall ruleset set --ruleset-id=syslog --enabled=true
esxcli network firewall refresh

Set loghost:

esxcli system syslog config set --loghost='tcp://syslog.server.co:514'
esxcli system syslog reload

Verify Syslog settings:

esxcli system syslog config get

Troubleshooting:
Check connectivity:

nc -z syslog.server.co 514

If you get the following error when setting the loghost its a DNS issue:

No root object set for output. The command did not provide proper output.
Implementation error!  The output of this command does not match the declared output type of this command, see errors above.

To check your name resolution:

nslookup syslog.server.co

Check your DNS servers:

esxcli network ip dns server list

If DNS needs to be set:

esxcli network ip dns server add --server=<server>
Upgrade ESXi 6.5 using the CLI

Here’s an easy procedure to update your ESXi to the latest build using the CLI and WebUI for Client.

Step1- List latest available packages:

esxcli software sources profile list -d https://hostupdate.vmware.com/software/VUM/PRODUCTION/main/vmw-depot-index.xml | grep -i ESXi-6.5.0-2022

Step2- Select latest, install and reboot:

esxcli software profile update -p ESXi-6.5.0-20221004001-standard -d http://hostupdate.vmware.com/software/VUM/PRODUCTION/main/vmw-depot-index.xml
reboot

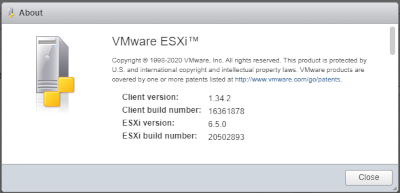
Step3- Verify latest build:

vmware -vl
VMware ESXi 6.5.0 build-20502893
VMware ESXi 6.5.0 Update 3

Step4- Verify latest client build:
Check version in web ui, under help, about

Step5- If needed upgrade client to latest using WebUI:

http://download3.vmware.com/software/vmw-tools/esxui/esxui-signed-latest.vib

Polycom Soundpoint 331/335 Upgrade

How to reset and update the Polycom Soundpoint 331 and 335 phone
Default pass: 456 or vonage account number
To reset pass: on boot hold down 1,3,5,7 and enter the MAC address
(use lowercase for any alpha characters)
Caution if you Reset to Factory you will need to reprovision the phone

Update the provisioning server either on boot or through Menu
Settings->Advanced->Admin Settings->Network Config
->Provisioning Server (on older phones this is Server Menu)
Set the provisioning server to: 140.242.64.35/411
Set server type to HTTP
You will need to use # to switch to various characters
Reboot the phone
The phone will show it’s upgrading and will reboot several times

After the upgrade you should be able to get into the web interface
https://[phoneip]
admin/456 or vonage account number
Set local DNS
Set local NTP

As of Dec, 2017 the following versions on 331/335
UC Software Version 4.1.1.0731
BootROM Software Version 5.1.1.0132

Reference:
Polycom Setup
Vonage Setup

Upgrade ESXi to 6.5 using the CLI

Here’s an easy three step procedure to update your ESXi to the latest build using the CLI.

Step1- SSH into your ESXi host and modify the firewall:

esxcli network firewall ruleset set -e true -r httpClient

Step2- List latest available packages:

esxcli software sources profile list -d https://hostupdate.vmware.com/software/VUM/PRODUCTION/main/vmw-depot-index.xml | grep -i ESXi-6.5

Step3- Select latest, install and reboot:

esxcli software profile update -p ESXi-6.5.0-4564106-standard -d http://hostupdate.vmware.com/software/VUM/PRODUCTION/main/vmw-depot-index.xml

Note I had to run Step3 twice on some hosts.

Redirect to HTTPS

sudo vim /etc/apache2/sites-enabled/000-default.conf

ServerAdmin webmaster@localhost
DocumentRoot /var/www/html/
RewriteEngine On
RewriteCond %{HTTPS} off
RewriteRule (.*) https://www.titantechcorp.com

sudo vim /etc/apache2/sites-available/default-ssl.conf

ServerAdmin webmaster@localhost
ServerName titantechcorp.com
ServerAlias www.titantechcorp.com
DocumentRoot /var/www/html/wordpress/

Upgrade ESXi to 6.5 from a USB Drive

Here’s an easy three step process to update your ESXi host to the latest build using a USB Flash Drive.

Step1- Download latest ISO VMware vSphere Hypervisor(ESXi) 6.5 ISO
https://my.vmware.com/en/group/vmware/evalcenter?p=free-esxi6

Step2- Download and run Rufus
https://rufus.akeo.ie/

Step3- Click the CD icon and point to the ISO you downloaded, leave everything else default and click start
(Note you may get a popup requesting to replace the menu, to avoid issues with the USB key not booting you’ll need to click Yes to download the updated file.)

I have performed this method on versions 5.5 and 6

Boot DBAN from a USB Flash Drive

Here’s a two step process to easily create a bootable DBAN USB dive to permanently erase a hardrive.

Step1- Download the latest ISO from DBAN:
http://www.dban.org/

Step2- Download and run the “Universal USB Installer”, select DBAN from the drop down list:
https://www.pendrivelinux.com/universal-usb-installer-easy-as-1-2-3/

Reference:
https://www.pendrivelinux.com/install-dban-to-a-usb-flash-drive-using-windows/